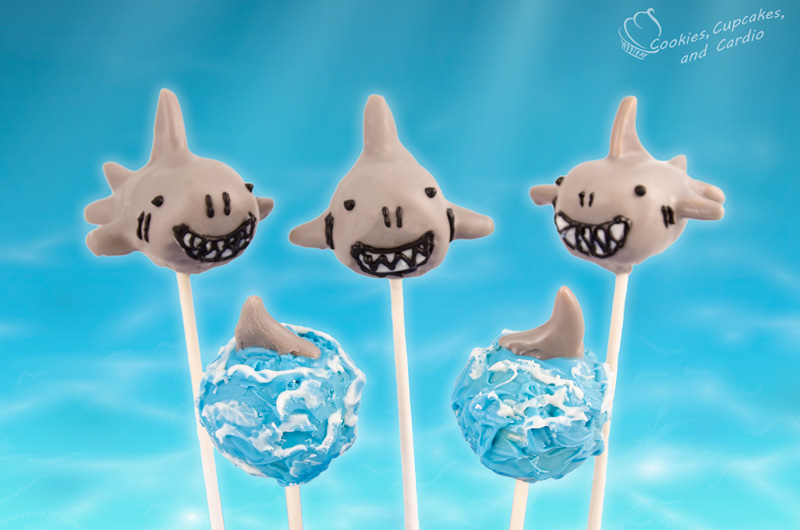
It’s time for Discovery’s Shark Week people! Get your life preservers, and water wings out as it’s time to head to the ocean! Or maybe not. With Shark Week all over social media and television, heading to the ocean right now is not at the top of my list. I’ll head out later once the images of razor sharp teeth, wide hinged jaws, and hungry feeding sharks have faced from memory.
Discovery contacted us to make something to help them celebrate shark week, so I thought that making some cute shark cake pops would be less traumatizing for some of our younger viewers. Shark week was originally started “to raise awareness and respect for sharks”. I guess shark week was the answer to the terror that Jaws created in the 1975- lets be friends instead!
If you want more information on Discovery’s Shark Week, check out their Facebook page and their Twitter feed.
Shark Cake Pops
Ingredients:
- Crumbled Cake
- Buttercream
- Blue melting chocolate wafers
- Black melting chocolate wafers
- White melting chocolate wafers
- Grey melting chocolate wafers
- Starburst candy
- Lollipop sticks
Procedure:
- Place prepared cake or cake scraps into a large bowl. Using both hands, crumble cake into tiny cake crumbs.
- Remove one cup of cake crumbs and combine with 2 tablespoons of buttercream and blend together, again using your hands until you get a playdough like consistency. If the mixture is too wet, add more crumbs. If it is too dry, add more buttercream.
- Using a small cookie scoop (2-3 tablespoons), scoop out equal portions of dough and roll each into a small ball. Place each ball on a parchment lined baking tray and set aside.
- For the shark shaped cake pops, take the cake ball, and shape it into a tear drop by gently working one end of the ball into a point. Then, press part of the wide end of the tear drop into the pan to form a flat, angled surface, which will be the shark’s mouth area.
- Melt your grey chocolate in a microwave in a microwave safe bowl, by using 30-60 second intervals at 50% power and stir repeatedly after each interval of time.
- When chocolate is melted and no chocolate chunks remain, dip an 1″ of a lollipop stick into the melted chocolate and insert the dipped portion of the stick into the middle of the cake ball and into the tear drops. Repeat as required.
- Take tray with cake pops and place into the freezer for about 10 minutes to harden the chocolate on the sticks.
- Once chocolate is set, you can place cake pops into a cake pop stand, or piece of Styrofoam.
- Remove wrapper from Starburst and cut into two triangles. Shape a triangle to form a shark fin, dip bottom of shark fin into the melted chocolate and place on top of the round cake pop. Allow to set.
- Once fin is set, dip the fin only portion of the cake pop into the grey chocolate and allow to set.
- Melt blue chocolate, and using a small spatula, apply blue chocolate to the round cake pop like waves- use small strokes of the spatula. Allow to set.
- On top of the “waves” apply a small amount of melted white chocolate from a piping bag. Spread white chocolate around to look like the crest of a wave.
- For the shark shaped cake pops: cut a Starburst into 2 triangles, and then each triangle again in half to form 4 thin triangles. Cut the 2 thin triangles in half each. Shape 2 of the small triangles into fins and place on either side of the shark’s body. Shape 2 more the of the small triangles into fins and place on either side of the end of the tail.
- Place shark cake pop into a cake pop stand so that you can work on the top of the shark. Use one of the larger triangles to form a fin for the top of the shark, dip it in chocolate and attach to the top of the cake pop. Use a smaller triangle to shape into a fin and place it between the 2 fins at the tail of the shark. Allow to set.
- Dip entire shark cake pop into the grey chocolate, tap off excess and allow to set.
- Using melted white chocolate in a piping bag, pipe a mouth area onto the flat portion of the mouth area and allow to set.
- Using melted black chocolate, outline the white mouth area and add sharp teeth. Apply gills to the side of the head area, two slits in the front above the mouth and two eyes on the side of the head.
- Allow to harden completely and serve when desired, or store in a sealed container in the refrigerator for 2-3 days.


Where can I purchase the silicon cookie shaped cake molls you used in your video making an Oreo Cookie Ice Cream cake? I think you said it was 8″ around.
Thanks
I got mine at a store called the Superstore, which is a grocery chain in Canada.