I don’t know about the weather where you are, but it has finally (fingers crossed) become SPRING here in Western Canada. To celebrate, Amber and I from SweetAmbs Cookies decided that we would make something “daisy” related on our YouTube channels.
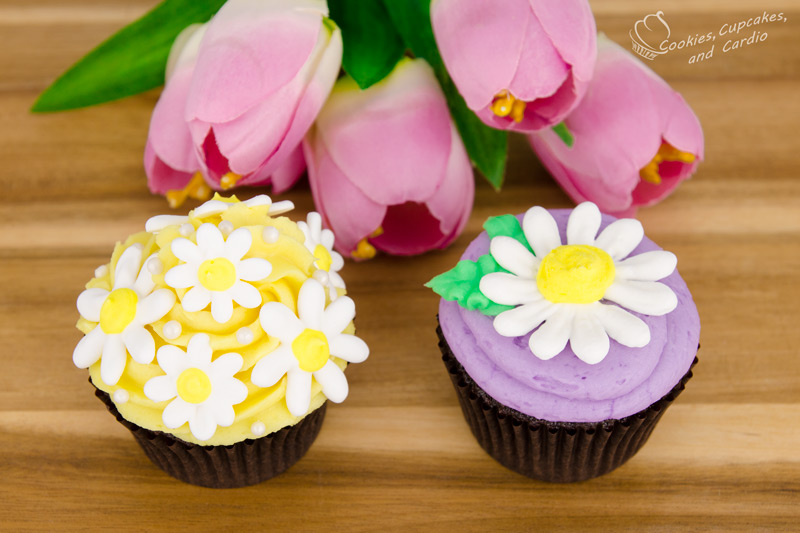
For my tutorial, I decided to go with decorating cupcakes with royal icing daisies of different sizes. I thought that covering one of the cupcakes in mini daisies and having a second cupcake with one large daisy on it would be a spring-like way to put this design together.
Working with royal icing is not something that is too difficult, but it does take some getting used to if you’re just beginning. The most challenging part is learning about getting the consistency of the icing correct so that you don’t end up with flowers or other decorations that are weeping or falling apart. If you need help with making royal icing, or need a recipe, check mine out here. With that said, making these daisies is easier than more complicated flowers (roses etc) because you don’t have to worry too much about consistency. If you go with a stiffer icing, the petals will stand apart better, and if you go with a thinner icing, the petals may meet and blend together, either of which will work for daisies in my opinion.
Definitely take note that these, and any royal icing decorations, will need to have ample drying time. These ones, being that they are relatively thin, will take around 24-48 hours.
Other than learning to work with royal icing, these cupcakes are relatively simple to make, and result in a very pretty finished product. I think they would make a beautiful display if you were thinking of having a daisy wedding theme as well. Imagine all of these cupcakes spread out over a large cupcake stand . . . it would look like a beautiful garden of daisies!
How to Make Royal Icing Daisy Cupcakes
Ingredients:
Prepared royal icing, medium stiffness, coloured:
- white, in a piping bag with petal tips Wilton 101, 102, 104
- yellow, in a piping bag with small round Wilton 10, 12
Prepared vanilla buttercream coloured:
- green, in a piping bag with a leaf tip
- yellow, in a piping bag with an large star tip
- purple, in a piping bag with a large round tip
Prepared cupcakes (flavour of your choosing)
Flower nail
Parchment squares
White sugar pearls
Procedure:
Royal Icing Daisies
*You will want to start with the royal icing a few days prior to needing them for this project. It will take the flowers 24-48 hours to dry completley.
- Prepare your royal icing in the two colours. Attach a parchment square to the flower nail with a small dab of royal icing. Starting in the centre of the nail, with the 101 petal tip, and the larger portion of the tip facing the outside of the nail, gently squeeze the white royal icing out of the bag, bringing the tip towards the centre of the nail. Turn the nail a small turn in one direction, and repeat for a second petal, turn nail again, repeat petal. Repeat this process until the petals fill the flower in.
- The process for each of the flower is the same, with the exception being that as the tips get larger, you will be making longer petals. When using the 102 tip, since it is larger, position it slightly further away from the middle of the nail, so that when you squeeze the royal icing out, there is more space for the petal to form. For the 104 tip, you will need to have it even further out, and the petals should match the radius of the nail.
- In the centre of each of the completed petals, squeeze a small amount of yellow royal icing on to each flower. For the larger petals, use the larger round tip (12) and for the smaller petals, use the smaller tip (10). Set the completed flowers aside, and allow to dry completely. Placing the wet flowers onto a baking tray makes for easy transportation if you need to move them.
Cupcake Assembly:
- Prepare desired flavour of cupcakes and prepare coloured buttercreams. Using the yellow buttercream, pipe a standard icing top, and add small daisies to the topping. Between the spaces of the daisies, add white sugar pearls.
- Using the purple buttercream, pipe a flat top onto the cupcake. Place a large daisy in the centre of the flat top. Add green leaves by using the green buttercream, and lining the tip up vertically, squeeze and pull the icing bag away from the flower. Stop squeezing, and gently pull the bag away completely.
- Serve and enjoy! These can be stored in the fridge for 2-3 days.
This was a great collab with Amber from SweetAmbs! In her video she makes an adorable daisy cookie pop, so make sure you check it out!


Can make something jelly please
I’ll add it to my list of requests.
Thank you
Would you please give me an idea for my sisters first baby shower. Her theme is Minnie Mouse. I want to do ALL cupcakes at the dessert table and one small cake as the center piece for her table where she will be sitting. It has already been decided to use Oreo or chocolate wafers as the ears on the cupcakes. Our colors are: red, pink, black with the white (sticking to Minnie’s attire).
I would greatly appreciate your input for this special occasion in our family.
With Smiles,
Tisha’s Happy Cake’s and Pie’s
Tisha (Baker)