I have learned to accept the fact that I live in an area of the world that some might call “red neck”. When P and I first got together, one of our first dates was to go out shooting (with a BB gun). It was a big deal, since I had never held any sort of gun before. I’m sure he thought about running from me as soon as he heard I hadn’t grown up in a hunting family. . . “What did you DO when you were growing up?”
Now, I understand that the meat I buy in the grocery store comes from an animal that probably doesn’t have a life as good as one that is free to roam in the forest. I also understand that it is important to teach about where the food on the table comes from. But truth be told, I like the separation of truth and fact that buying meat from the store allows. I don’t want to see my dinner running through the trees, only to see it in the back of the truck . . . which is something that one sees on a regular basis when driving through town here during hunting season . . . before having it served on my plate for dinner.
With that being said, I have liked the wild game meat that I have tried . . . my friend Janine’s husband makes an awesome Elk burger! But when eating this burger, I simply showed up, saw it on the barbecue, and ate it for dinner. I didn’t have to traipse through the woods in boots and camouflage, or drag it home through the bush.
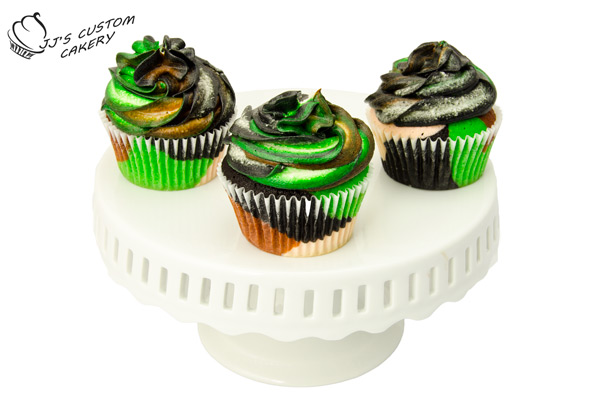
Spending time around “hunting talk” has opened my eyes to the importance of it, and the value in teaching about it. But, when P suggested I make Camouflage Cupcakes for the start of hunting season in September, I STILL didn’t want to do it.
And when I did . . . they sold like hot cakes. Unfortunately for me.
Camouflage Cupcakes
This will make 18-22 cupcakes.
Ingredients/Materials:
-
Vanilla Cake
-
Vanilla Buttercream
-
Black, green, and brown gel paste
Procedure:
Cupcakes
-
Preheat oven to 350˚F/180˚C. Line cupcake pans with liners.
-
Prepare cake batter and separate into four equal portions. In the first bowl, colour the batter black by using a ¼ teaspoon (1.25 milliliters) of paste (you may need to use more black paste to get a true black colour).
-
In the second bowl, colour the batter green using a ¼ teaspoon (1.25 milliliters) of paste.
-
In the third bowl, colour the batter brown using a ¼ teaspoon (1.25 milliliters) of paste and in the last bowl, use one to two drops of brown colouring to make a beige colour.
-
Spoon about a tablespoon of each colour into each well. The wells should be about ⅔ full.
-
Bake in the oven for 20 minutes, or until a toothpick inserted into the centre comes out clean. Allow to cool in the pan for 5-10 minutes, remove from pan, and cool cupcakes completely on a wire rack.
Buttercream
-
While cupcakes are cooling, prepare and divide vanilla buttercream into four equal portions. In the first bowl, colour the buttercream black by using a ¼ teaspoon (1.25 milliliters) of paste. In the second bowl, colour the buttercream green using a ¼ teaspoon (1.25 milliliters) of paste. In the third bowl, colour the buttercream brown using a ¼ teaspoon (1.25 milliliters) of paste and leave the fourth bowl plain. You can make it beige if you desire, but I preferred to have it be an off white colour to contrast brightly with the green, brown and black.
-
Prepare your piping bag with a 1M (star) tip in the end and open the top wide. Imagine that the opening of the bag is a clock. At 12:00, place a dollop of black, 3:00 a dollop of brown, 6:00, a dollop of white and at 9:00, the green. Repeat until the piping bag is full and ready to be used. This technique ensures that you will have a range of colours that come out of the tip when piping.
-
To ice the cupcakes, squeeze/pipe a dollop of icing in the centre of the cupcake. Then, pipe a loop around and over top of the center dollop to finish off your cupcake. The colours should swirl together for a great camouflage look.
- Serve immediately, or store in the fridge in a sealed container for 2-3 days. Allow buttercream to come to room temperature (about one hour) if they have been in the fridge before serving.


Love this idea. I am going to try it for my son’s 9th Birthday next month! Thanks for all the great tutorials.
I’m glad you like it!! Thanks so much…I hope he has a great birthday!