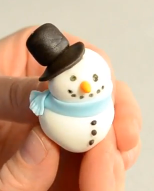
 As a kid, I remember rolling, and rolling and rolling to make the biggest and greatest snowman that I could. My brother, being 3 years younger than me, was either helping me, or trying to beat me. He was slightly competitive!
Often, our attempts were futile, as the pieces of the snowman would get so big that we could never get them off the ground and piled up on top of each other.
Once, back inside, warming up with a mug of hot chocolate, I remember looking out the window and seeing all of the tracks that the rolling snowballs made all over the lawn, and the “dead” snowballs at the end of them. . . the ones that were too heavy to roll any further, or even attempt to lift. They were often quite ugly, tube shaped and covered with brown chunks of grass that had been picked up along the way!
We had poor, pathetic Frosty’s that we tried to build on the lawn each year, but apparently frosty was always happy heading, thumpety, thump, thump, thumpety, thump, thump down the road, built up beautifully in someone else’s yard.
Now, I have sweet revenge on ole Frosty with the adult form of playdough- fondant! Perfect snowmen are a breeze when you’re not working with the real thing!
The fondant that I use in the video is from a company called Satin Ice. Their fondant is easy to work with, tastes ok and is generally reliable to stay malleable for longer than certain other brands.
What you will need to make your own Snowman:
- Small chunks of black (for the hat), blue (for the scarf…which could be any colour), orange (for the nose) and white (for the body) fondant.
- An edible ink marker could be used for detailing on the face and buttons of the snowman, or you can use tiny pieces of black fondant as coal.
- Toothpicks, or raw spaghetti is needed for giving the snowman extra support.
- Veining tool, and a variety of other gum paste modelling tools– sold here
Have a look at the video, and if you have any questions, let me know and I will happily help you through them!


